|
|
Table of contents |
A Guide to Honing and Sharpening
Removal
of The Burr
Click
on the picture to enlarge
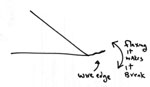 |
What we now have is a tool with a burr at the end. The burr is weak but still attached to the body of the tool. What we want to do is remove it carefully, leaving a sharp, even edge behind. We remove the wire edge by continuing to hone both sides. This abrades the areas joining the burr with the tool. Also, by working both sides of the tool the motion flexes the burr back and forth weakening it, much like bending a paperclip back and forth until it breaks. |
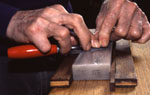 |
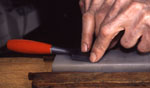
A: Rub back of blade on Arkansas stone. Hold tool perfectly flat. Do not hold the handle at all; Keep the tool flat on the stone by downward finger pressure on the the blade alone. THe only exception to this are unually long or heavy tools which are easier to keep flat on the stone with a slight assist from below. Rub 10 - 20 circular strokes. Burr will shift to bevel (front) side. This is called "chasing the burr." |
 |
Notice how, while honing the back, the pressure is placed on the front of the tool, near the edge. Neverless the tool remains flat on its back and we are not lifting up from the stone at all during this process. |
 |
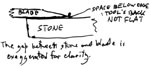
Be careful: if you run the handle of the tool onto the stone you can, accidently, lift of the flat back off the cutting edge, spoiling its flatness. |
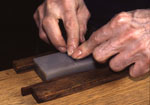
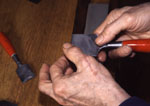
| B: Rub bevel on Arkansas stone 10 - 20 strokes. This step is exactly like the previous bevel honing. The wire edge will flip over to the back. | |
 |
Repeat II A and II B until burr cannot be felt. Putting a finger on a blade is a time-honored way of checking for the burr, but be careful. These tools are sharp. Lightly run your finger from the back of the chisel off the edge. Not the other way around. After you hone the back the burr should be felt on the bevel side. After you hone the bevel the burr should be felt on the back side. As you flop back and forth, honing each side there will be less and less burr to be felt. Sometimes the burr drops off onto the stone, as a fine silver wire. When the burr is gone, you are done. Congratulations! |
|
If the burr does not seem to be moving from back to bevel as you hone, check the flatness of the back of the tool. A common cause when you cannot move the burr from the back to the bevel, is that the back of the tool isn't actually flat and the burr isn't being touched and abraded by the stone. In the case of waterstones also check the flatness of your stones. Note: Sometimes a back of a tool that was previously flat seems to be not flat at the very edge. This can happen due to accidentally lifting the tool during this step or, very possibly, because of heavy use, the back of the blade, next the edge can actually wear. |
![]()
![]()