
|
|
Table of contents |
A Guide to Honing and Sharpening
Consolidating
the Edge: The Microbevel
Honing
at a raised angle (5 degrees or so) consolidates and strengthens the edge
by forming a second (more obtuse) bevel. This is an option. Old "carpenters'"
style allowed a considerable 2nd bevel to accumulate before grinding anew
- this is for rugged work. In Japanese sharpening, no secondary bevel
of any sort is used. A sensible modern expedient is the micro bevel shown
in this lesson. The total width of the microbevel should be the smallest
amount of honing that produces a small burr all along the edge.
Click on the picture to enlarge
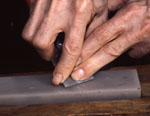 |
A. Rub bevel lightly on Arkansas stone with 5 degree increase in angle. Hold the chisel as before and then very slightly raise the back of the handle a miniscule amount with your pinky. It's hard to maintain a consistent angle with the handle raised so only move the chisel in one direction, then lift the chisel and return to start, and repeat. Do 5 strokes, forward motion only.
|
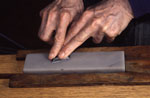 |
B. Rub the back of the tool perfectly flat on the Arkansas stone to remove any new burr raised in the prior step. Note: Never microbevel the back of the blade; it remains flat to the stone thoughout. |
|
Repeat III A and III B as necessary until the new burr is gone. The total width of the micro bevel, especially in the first honing after a grind, should really be micro: barely visible under a bright light. In subsequent honings this minimal micro bevel will be easily leveled out on the medium grit stone allowing you to start from scratch. However, the easiest way is not always the best way. For a good rugged edge, try this useful alternative: Retain the original micro bevel (don't eradicate it each time)! Allow it to become subtly more obvious each honing. If the medium stone become necessary on the micro bevel, so be it. This gives a tougher working edge for heavier cuts such as chopping out mortises or hogging out oak, in which the reasonably keen axe is preferable to the scalpel. But as soon as the cumulative micro bevel resists getting effectively sharp, eliminate it on a rough stone or by grinding and go back to square one. |
|
|
The process can be restated in a little more expansively A step by step summary of the process of forming the microbevel:
Try to keep the new angle as small an increment as you can, and consistent, in each pass. |
|
![]()
![]()