|
|
Table of contents |
A Guide to Honing and Sharpening
Stropping
Click on the picture to enlarge
| The purpose of stropping is not to abrade more metal, but rather to continue bending, flexing, fatiguing, and burnishing off the miniscule metal strands still clinging to the edge of the blade after the burr breaks off. If you sharpen with waterstones and use a "gold" 8000 grit stone as a final step, stropping is not necessary. | |
 |
Strop
the bevel and back of the tool using a smooth firm piece of leather
(very hard machine-belt leather is not good). Do not use abrasive
dressings on leather - they are coarser than the Arkansas stone
and will remove its effects. Wipe honing oil off the tool before
stropping. Strop on clean, undressed leather only. A good size for a strop is around 14" long by 3" wide. A single thickness of leather, held down on the bench with the left hand as you strop with the right, is satisfactory. However, it is worth the small extra effort to tack two layers of leather onto a 1 ½" thick piece of dressed wood, 12" x 3". A 1/16" layer of hard felt between leather and wood makes an ideally mellow but firm strop that is less prone to bend the micro-thin cutting edge at the end of a stroke. The 1 ½" thickness of the wood allows it to be held in a vise, ¾" proud of the surrounding surface, or to be comfortably elevated above the bench, gripped by the left hand. |
 |
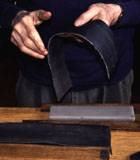
A: Strop in 1 direction only, with the tool's edge trailing. The little animation on the left shows the stroke (hit your browser refresh button to reanimate it again). holding the bevel flat on the strop as if you were honing on a stone, draw the chisel across the strop. It's comforting to know that when stropping on leather the slight inaccuracy inherent in a one-handed stroke doesn't do the bevel damage that it would do on stone - nevertheless, try to keep your angle about as steady as if you were honing (on stone). It's too easy to relax and to speed, and to curve your stroke too much. Re-check the angle with a left hand finger from time to time. Notice how the the follow-through of the stroke elevates slightly before it goes off the end of the strop. The whole arm raises, like an airplane taking off. Then replace the chisel at the beginning of the strop and strop again. During the contact part of this stroke the tool does not change angle. (The fragile, thin edge can actually be turned if firmly pressed out of true on the upswing.) |
 |
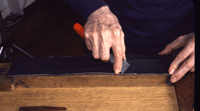
B: After 10 or 20 strokes on the bevel, flip the tool over and strop the back. Place the chisel blade flat on the strop and then draw itthe length of the strop. Lift and repeat 10 or 20 times. |
| Repeat steps A and B several times. The blade will change from sharp to silky sharp. After this step you are ready to begin your woodworking. | |
![]()
![]()